Connect to Internet
Sam Houston understands that access to the internet is a crucial aspect of academic life; therefore, it is provided on campus to students, employees, and guests. Use the options below to learn how to connect your personal device to SHSU internet services while on campus. SHSU-issued managed desktops and laptops are designed to connect automatically.
Prohibited DevicesTo ensure network security while providing reliable internet access, the following devices are not supported on the SHSU network:
- Routers
- Wireless printers without cloud printing option
- Personal surveillance cameras (e.g., Nest Cameras)
In spring 2023 some technologies became prohibited on state devices and networks. You can find a list of current restrictions and additional information on how these new laws and policies are carried out at SHSU. This will means that some websites (e.g. TikTok) will not be available on the SHSU wi-fi network with an exception for our residence hall students.
A SHSU member is an enrolled student, current employee, or active affiliate with an SHSU username and password.
Wireless provides internet over the air, while wired provides internet via an ethernet cable.
How To Connect Device
- Open Settings.
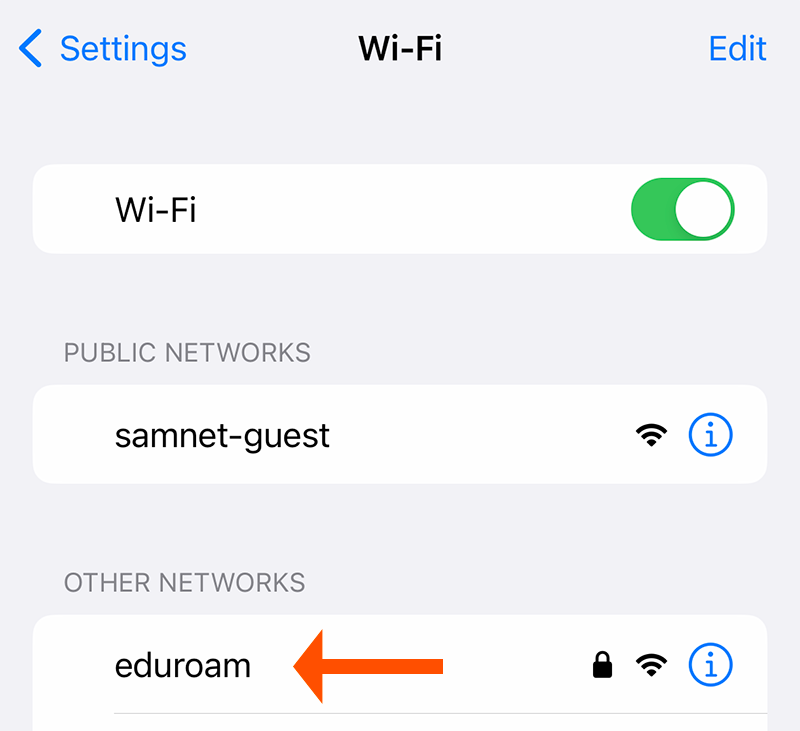
- Select Wi-Fi.
- Select Eduroam from the list of networks.
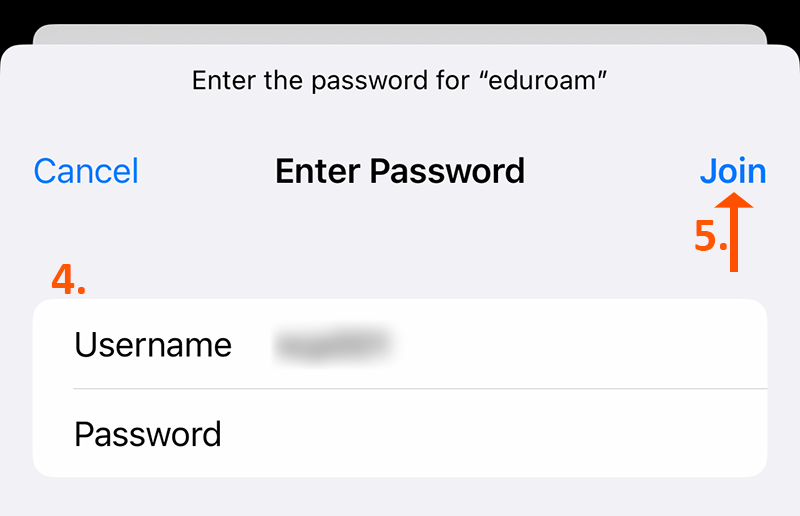
- Enter your SHSU email address and password.
- Select Join.
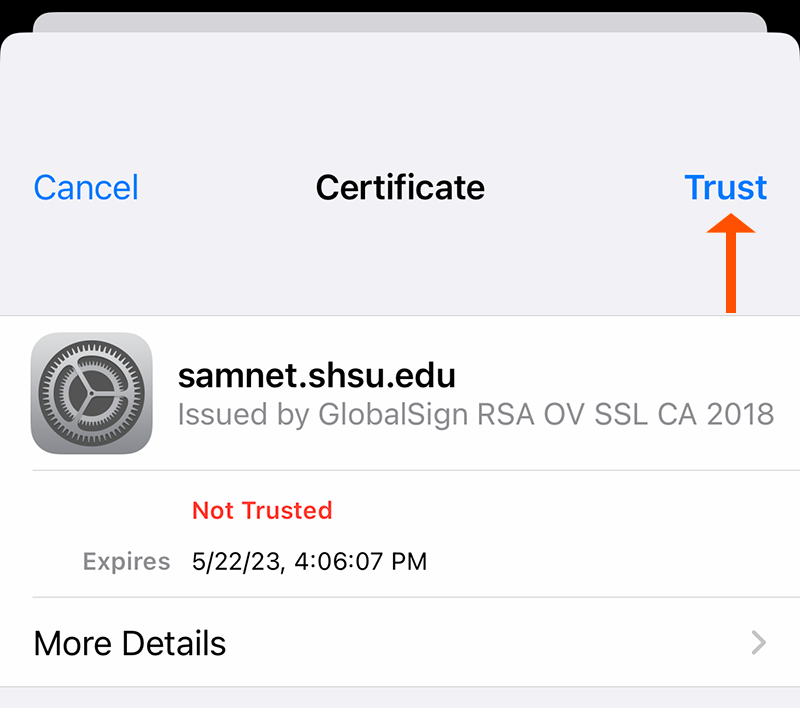
- If you receive a notification regarding a certificate, select Trust.
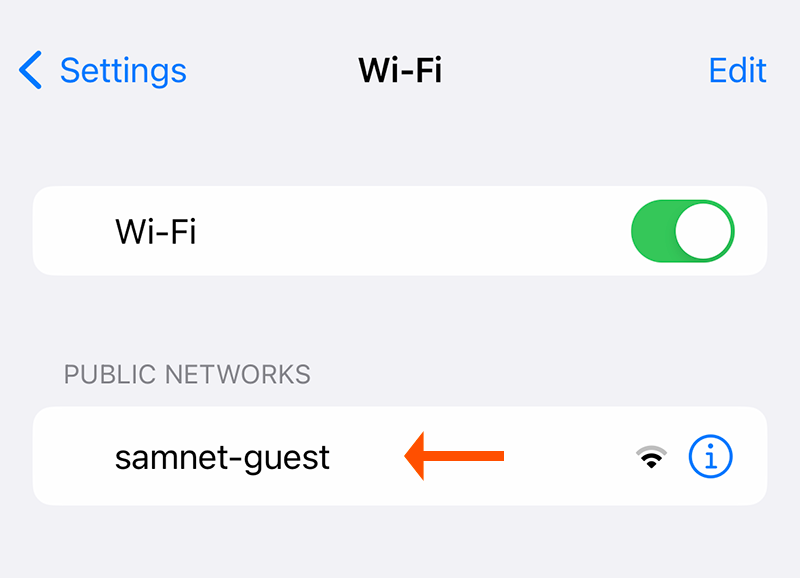
- Open Settings.
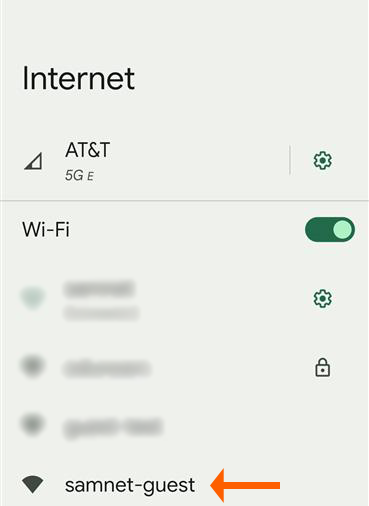
- Select Wi-Fi.
- Select samnet-guest.
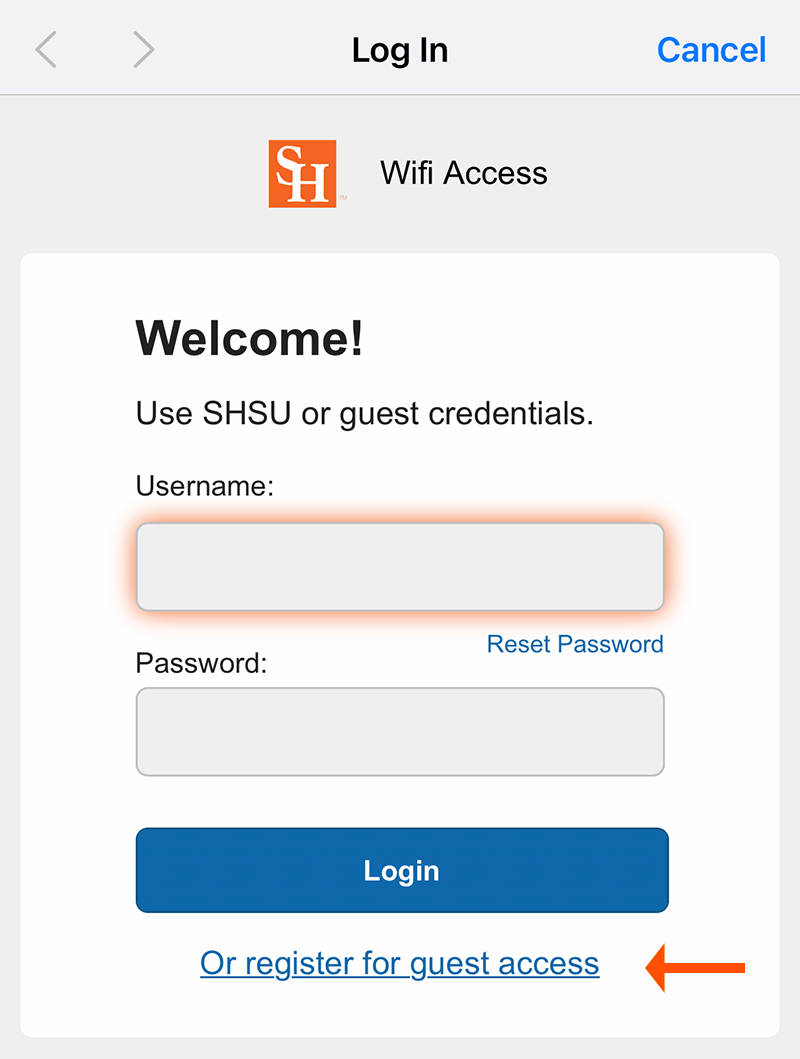
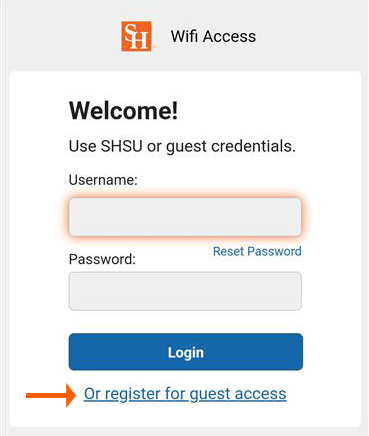
- Login with your username and password if you created an account within the last 7 days. Otherwise, Select Or register for guest access under the login button.
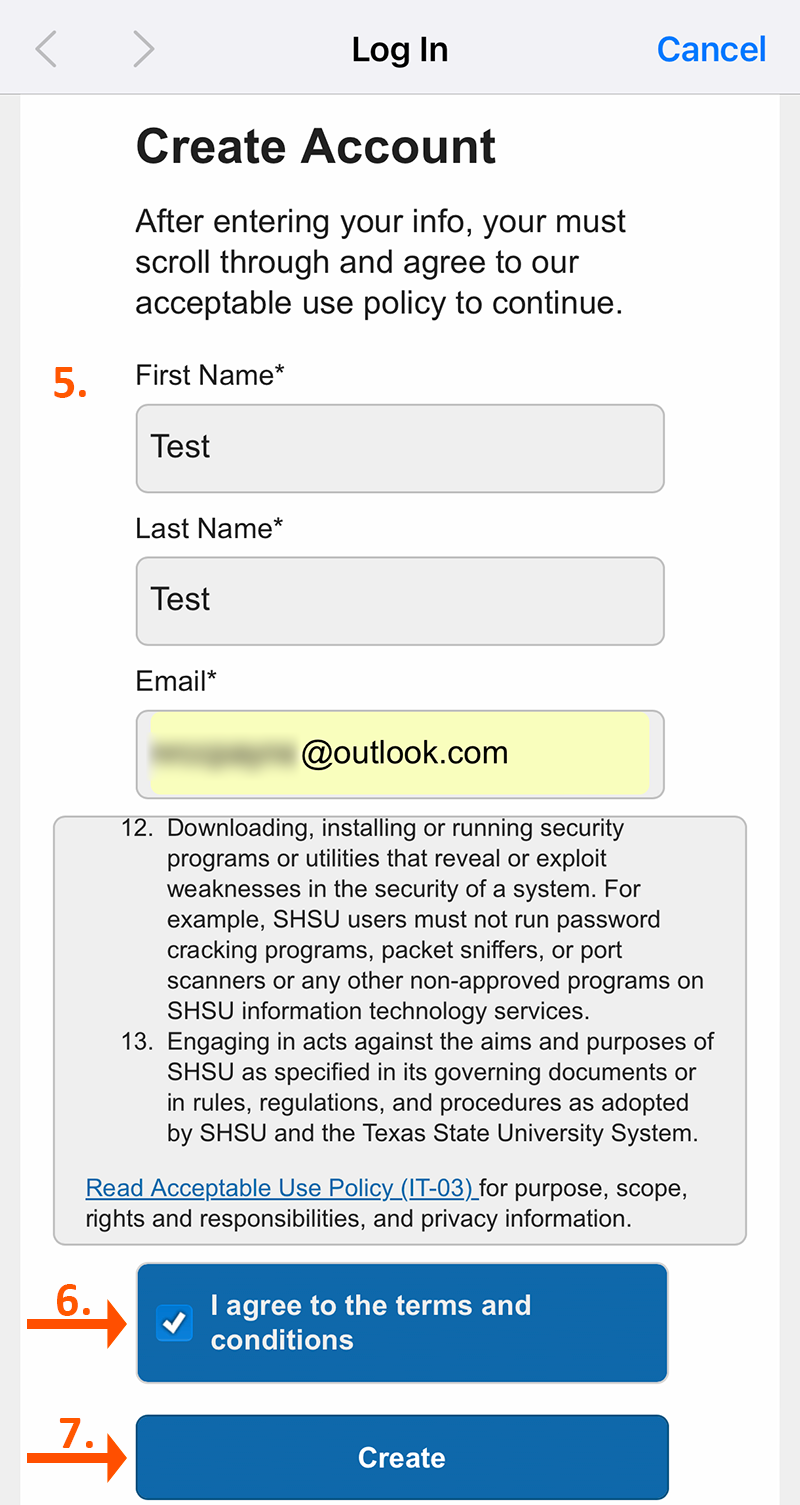
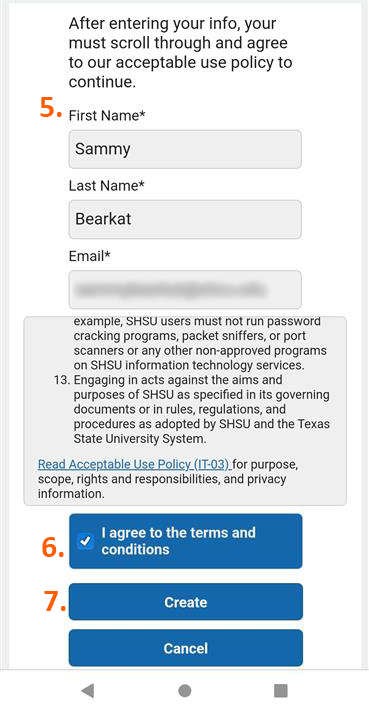
- Enter your first name, last name and email address (must be a non-SHSU email address).
- Scroll through the Acceptable Use Policy and place a checkmark in the box for I agree to the terms and conditions.
- Select Create.
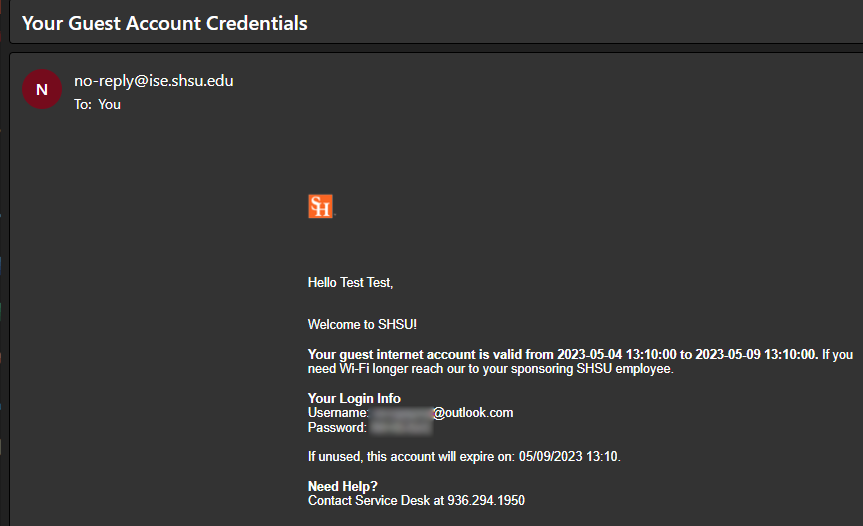
- A guest account is created. A confirmation screen will display and an email is sent.
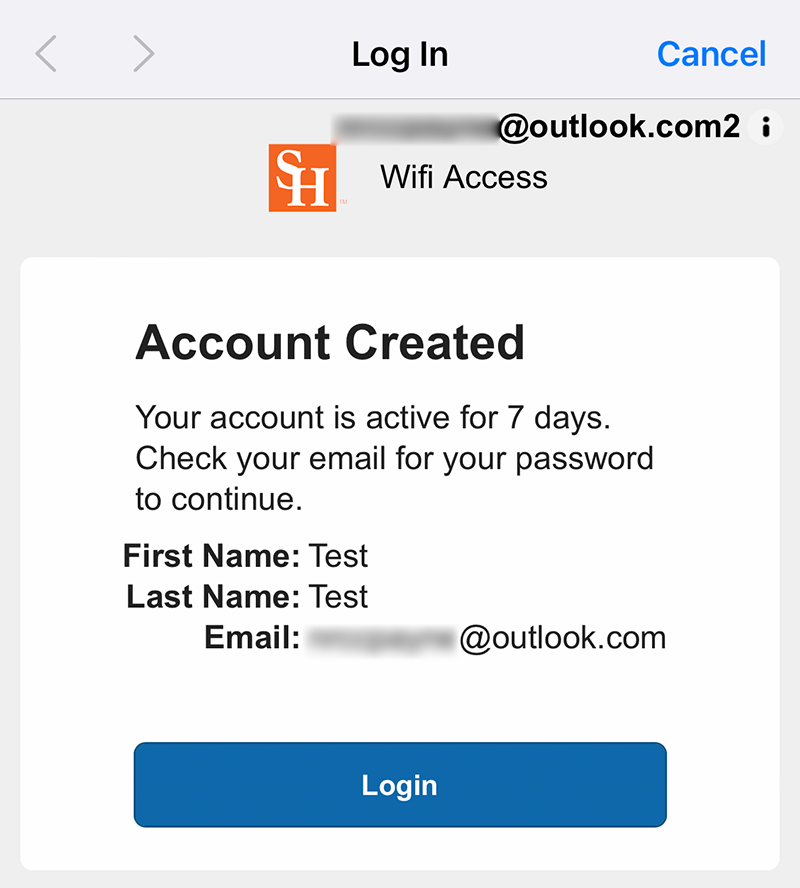
- Check the email for the username and password to access the samnet-guest network.
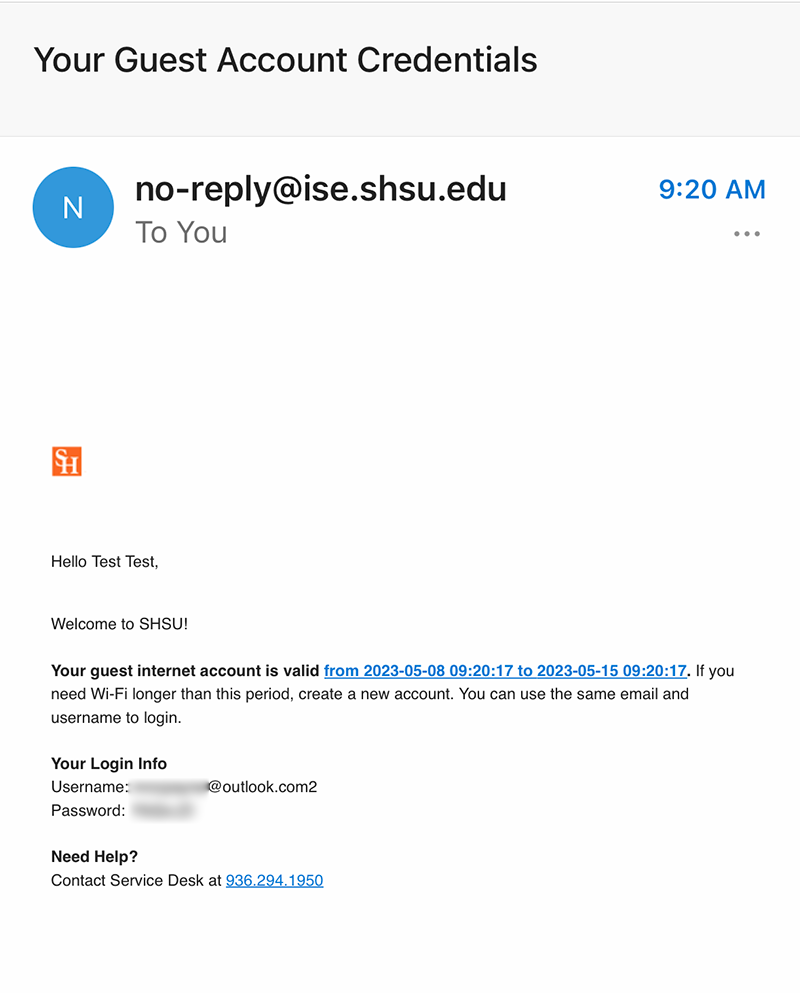
- Return to the login page to enter your username and password.
- Open Settings.
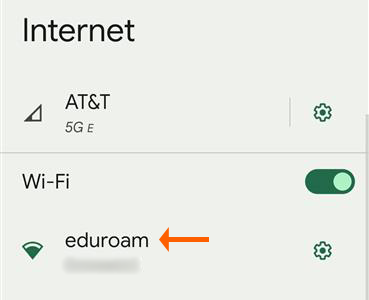
- Select Wi-Fi.
- Select Eduroam.
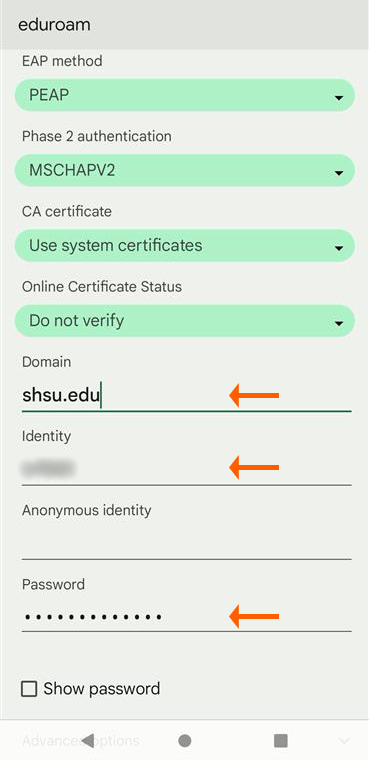
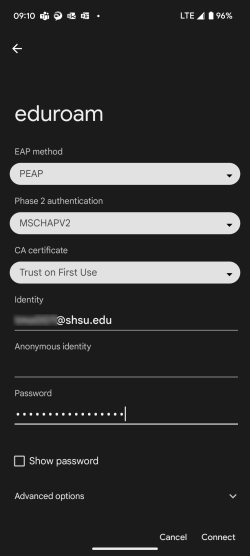
- Enter shsu.edu for the Domain.
- Enter your SHSU email address and password and select Join. (Please note: If you are using a Google device, select "Trust on First Use" for the CA Certificate.)
- Open Settings.
- Select Wi-Fi.
- Select samnet-guest.
- Login with your username and password if you created an account within the last 7 days. Otherwise, Select Or register for guest access under the login button.
- Enter your first name, last name and email address (must be a non-SHSU email address).
- Scroll through the Acceptable Use Policy and place a checkmark in the box for I agree to the terms and conditions.
- Select Create.
- A guest account is be created and a confirmation screen will display. An email is sent with username and password.

- Return to the login page to enter your username and password.
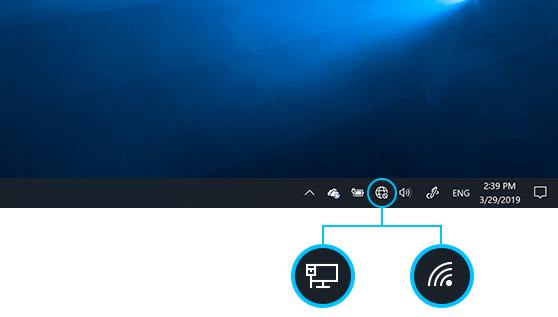
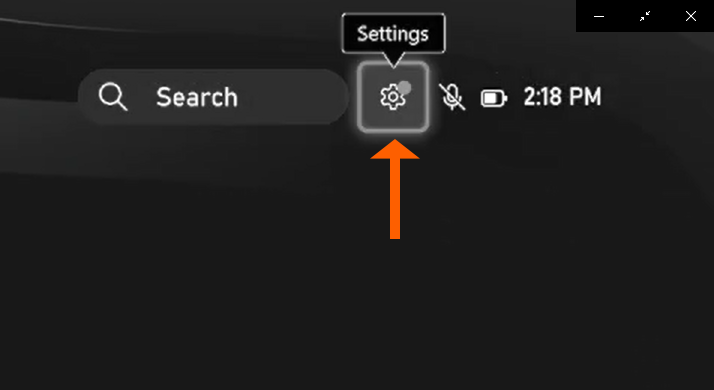
- Select the Network icon on the taskbar. The icon that appears depends on your current connection state. If you don’t see one of the network icons (or a similar one) shown in the following image, select the Up arrow to see if it appears there.
- Select Eduroam.
- Enter your SHSU email address and password.
- Select Join.
- Connect the ethernet cable to the device.
- Depending on device settings,
- A pop up will display requesting your SHSU username and password.
- If a pop up does not display, open a web browser to sign in with your SHSU username and password.
- Select the Network icon on the taskbar. The icon that appears depends on your current connection state. If you don’t see one of the network icons (or a similar one) shown in the following image, select the Up arrow to see if it appears there.
- Select samnet-guest.
- Login with your username and password if you created an account within the last 7 days. Otherwise, Select Or register for guest access under the login button.
- To create a guest account, enter your first name, last name, and mail address (must be a non-SHSU email address).
- Scroll through the Acceptable Use Policy and place a checkmark in the box for I agree to the terms and conditions.
- Select Create.
- A guest is created, a confirmation page will display and an email will be sent with the username and password.
- Return to the login page and enter your login information from the email to access the samnet-guest network.
- Select the Apple menu.

- Select System Settings.
- Select Wi-Fi.

- Select Eduroam.
- Enter your SHSU email address and password.
- Select Join.
- Connect the ethernet cable to the device.
- Depending on device settings,
- A pop up will display requesting your SHSU username and password.
- If a pop up does not display, open a web browser to sign in with your SHSU username and password.
- Select the Apple menu.
- Select System Settings.
- Select Wi-Fi.
- Select samnet-guest.
- Login with your username and password if you created an account within the last 7 days. Otherwise, Select Or register for guest access under the login button.
- To create a guest account, enter your first name, last name, and mail address (must be a non-SHSU email address).
- Scroll through the Acceptable Use Policy and place a checkmark in the box for I agree to the terms and conditions.
- Select Create.
- A guest is created, a confirmation page will display and an email will be sent with the username and password.
- Return to the login page and enter your login information from the email to access the samnet-guest network.
Find the Mac Address
To get started, you will need the MAC address of the device.
- Navigate to Settings.
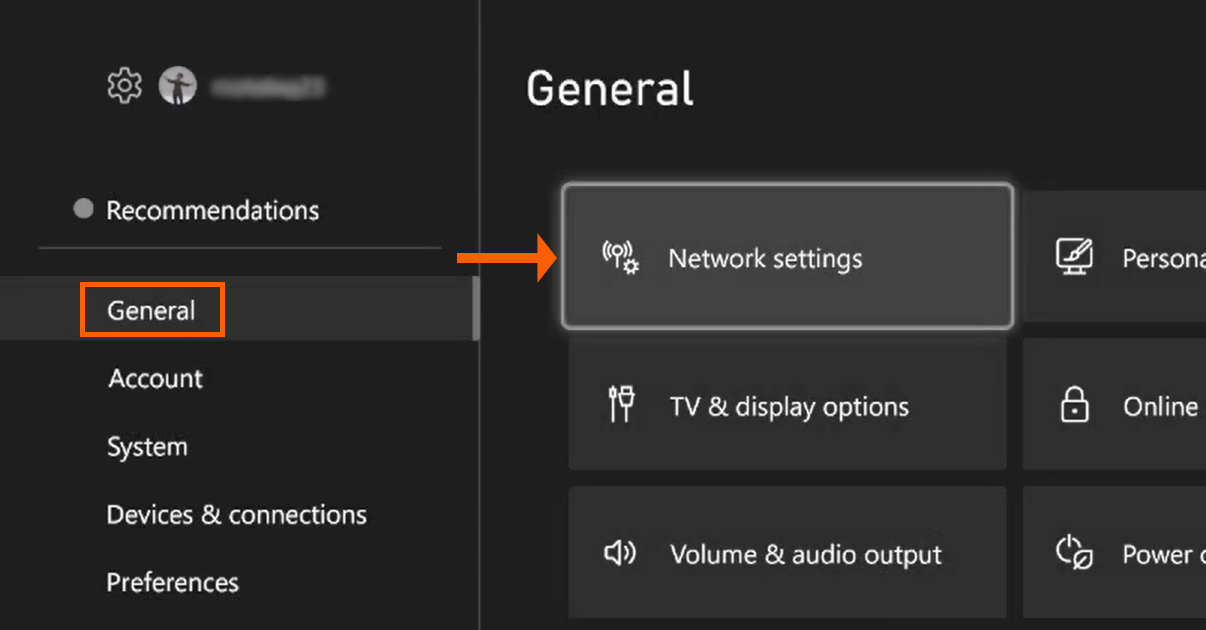
- In the General options, select Network Settings.
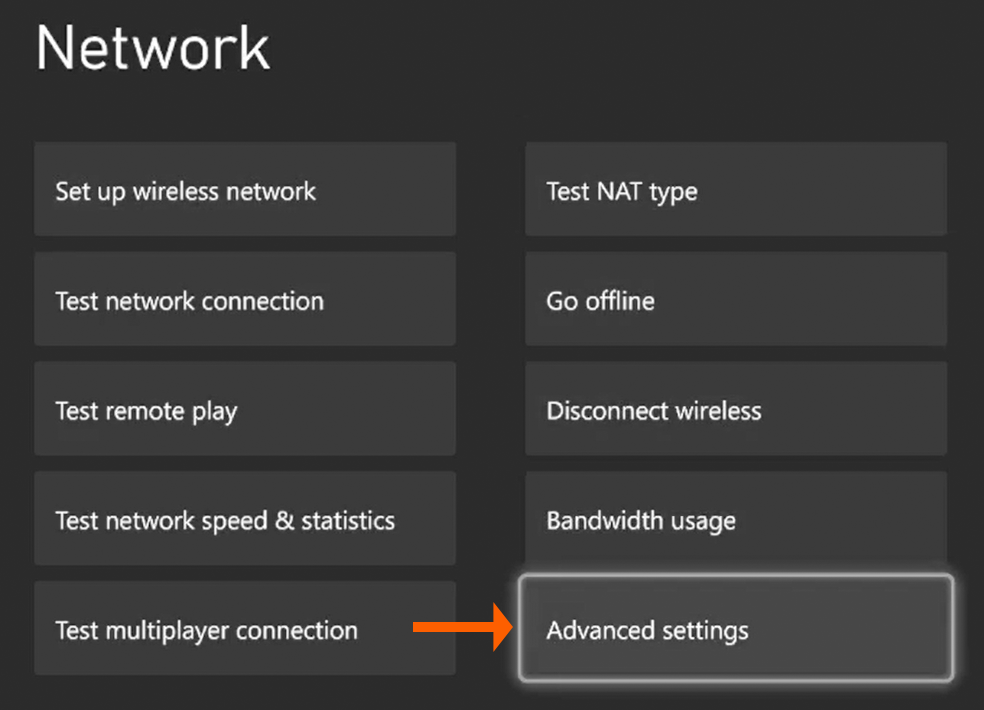
- In Network Settings, select Advanced Settings.
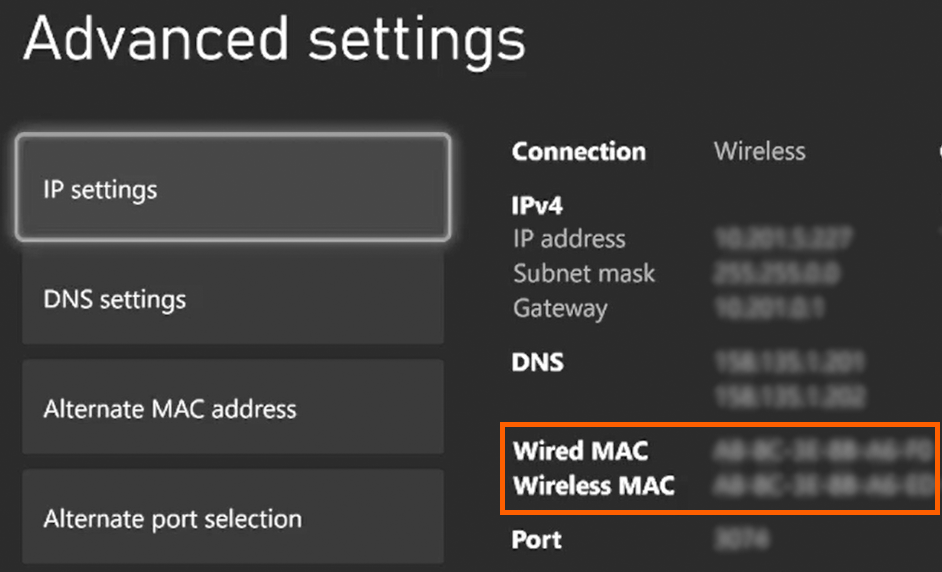
- The MAC addresses is listed in Advanced Settings.
- Once you have the MAC address, register the device in MyDevices.
Register the Device
- As of August 15, 2024, if you are a residence hall resident, visit reshalldevices.shsu.edu. All others visit mydevices.shsu.edu.
- Sign in with your SHSU username and password if prompted.
- Scroll through the Acceptable Use policy and select I Agree.

- On the Residence Hall Devices or My Devices screen, select Add.
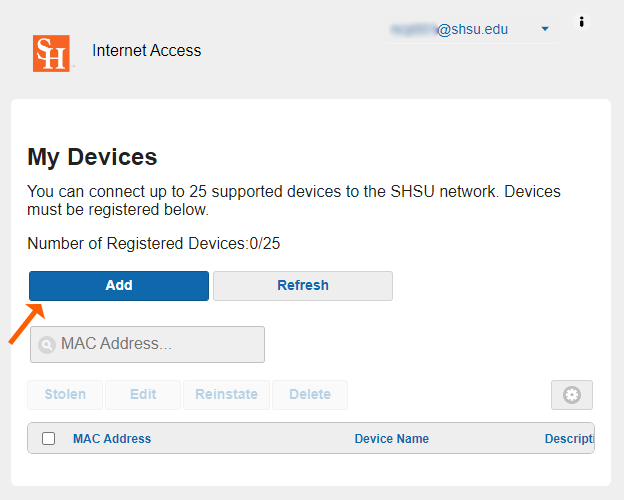
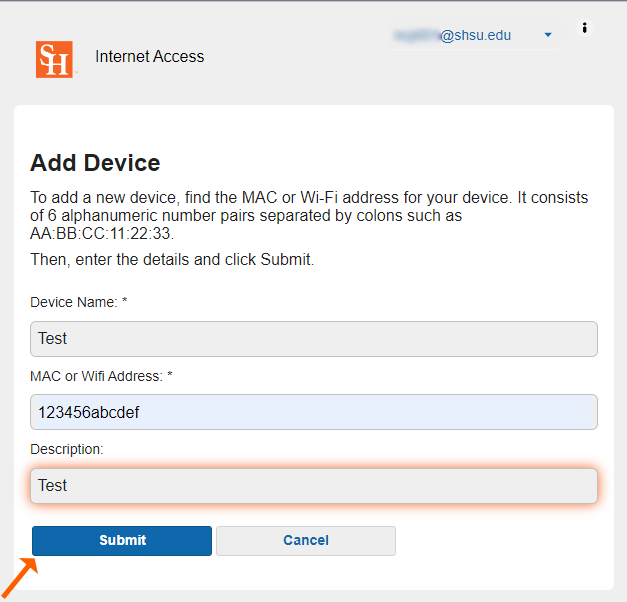
- On the Add Device screen, fill in the fields and select Submit.
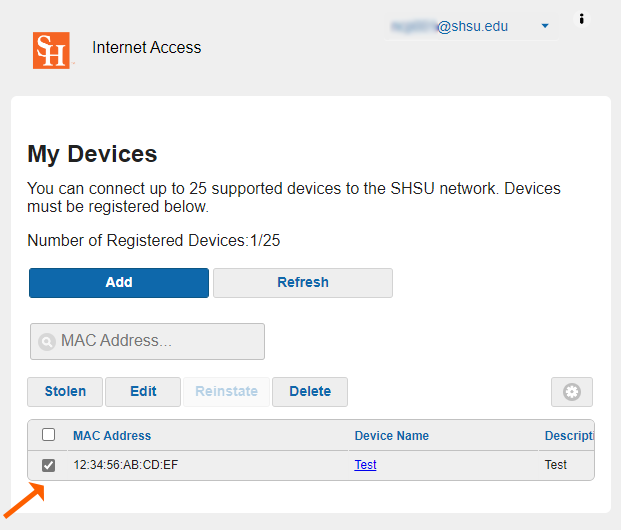
- Your device is added to Residence Hall Devices or My Devices.
- Connect the device to the network.
Connect Device to the Network
- Navigate to Settings.
- In the General options, select Network Settings.
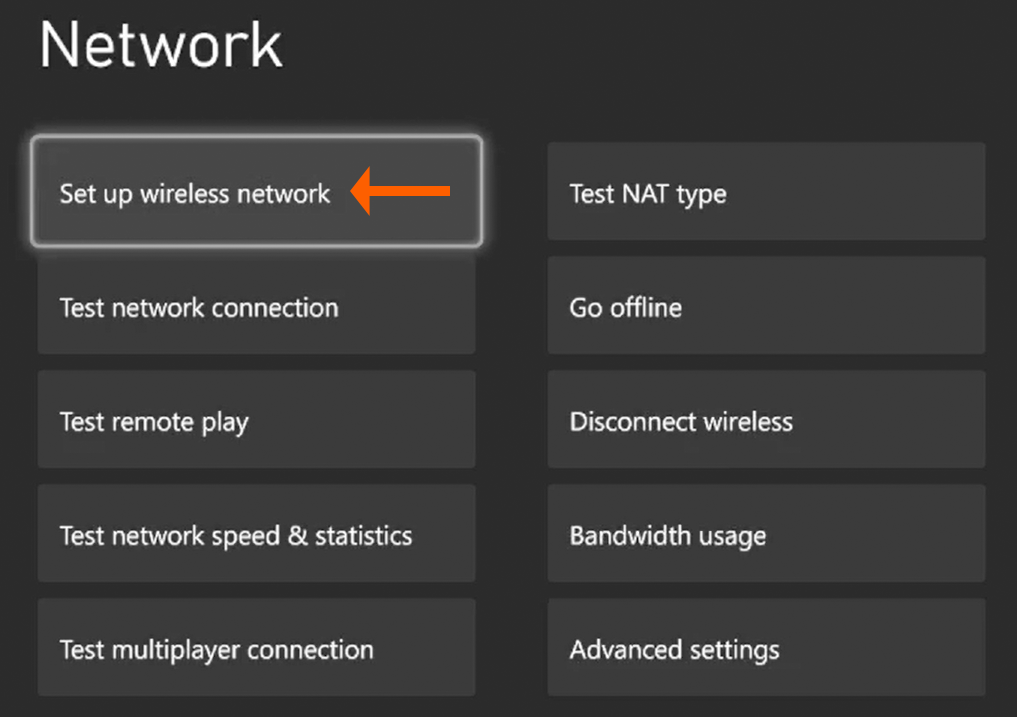
- In Network Settings, select Set up wireless network.
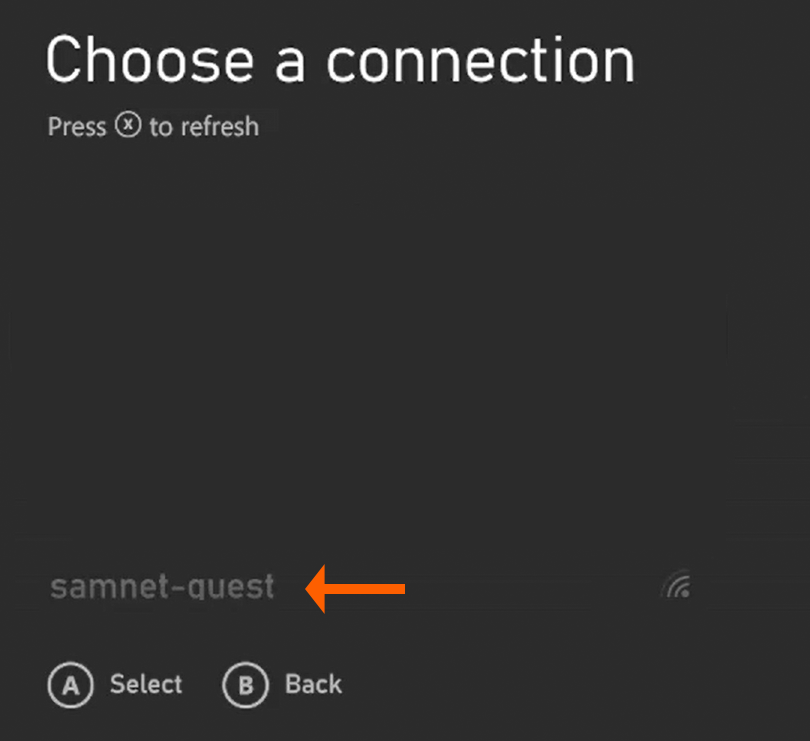
- On the list of connections, select samnet-guest.
Find the MAC Address
To get started, you will need the MAC address of the device.
- Navigate to Settings.
- In the General options, select Network Settings.
- In Network Settings, select Advanced Settings.
- The MAC addresses is listed in Advanced Settings.
- Once you have the MAC address, you need to register the device in MyDevices.
Register the Device
- As of August 15, 2024, if you are a residence hall resident, visit reshalldevices.shsu.edu. All others visit mydevices.shsu.edu.
- Sign in with your SHSU username and password if prompted.
- Scroll through the Acceptable Use policy and select I Agree.
- On the Residence Hall Devices or My Devices screen, select Add.
- On the Add Device screen, fill in the fields and select Submit.
- Your device is added to Residence Hall Devices or My Devices.
- Connect an ethernet cable to the device to connect to the network.
Find the MAC Address
To get started, you will need the MAC address of the device.
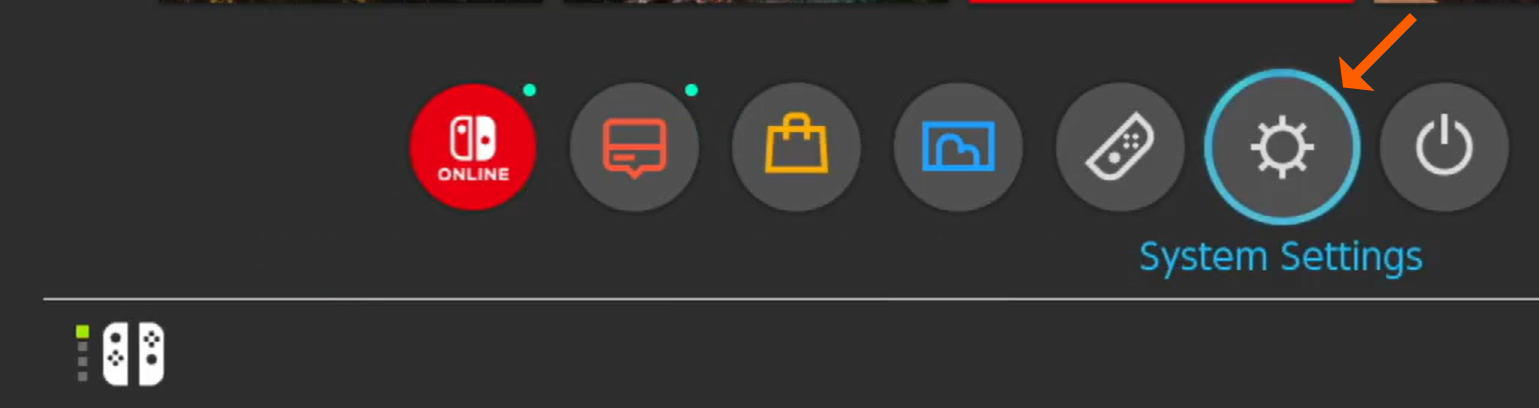
- Navigate to System Settings.
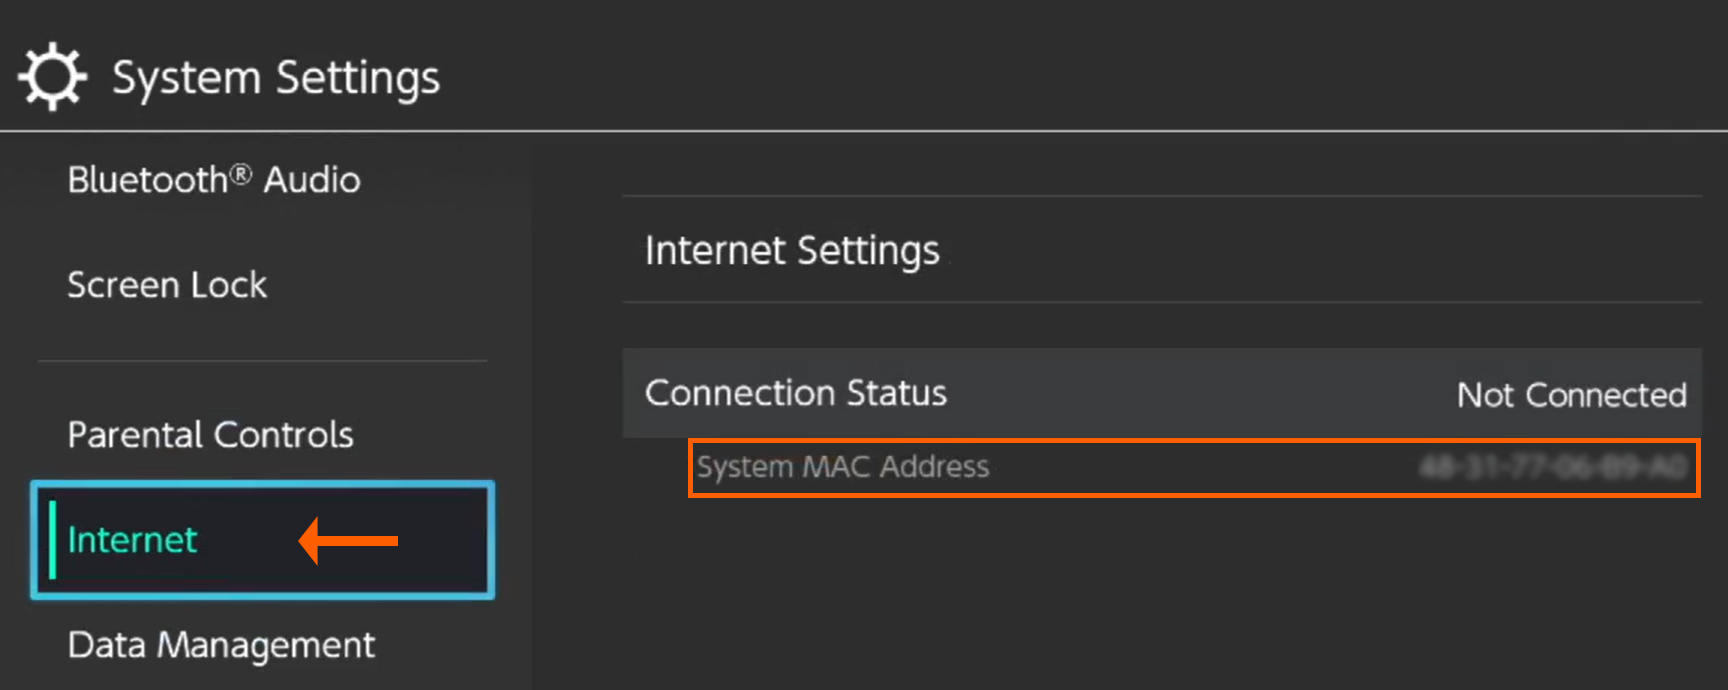
- In the System Settings options, select Internet. The MAC address will be listed in Connection Status.
- Once you have the MAC address, register the device in MyDevices.
Register the Device
- As of August 15, 2024, if you are a residence hall resident, visit reshalldevices.shsu.edu. All others visit mydevices.shsu.edu.
- Sign in with your SHSU username and password if prompted.
- Scroll through the Acceptable Use policy and select I Agree.
- On the Residence Hall Devices or My Devices screen, select Add.

- On the Add Device screen, fill in the fields and select Submit.

- Your device is now added to Residence Hall Devices or MyDevices.

- Connect the device to the network.
Connect Device to the Network
- Navigate to System Settings.
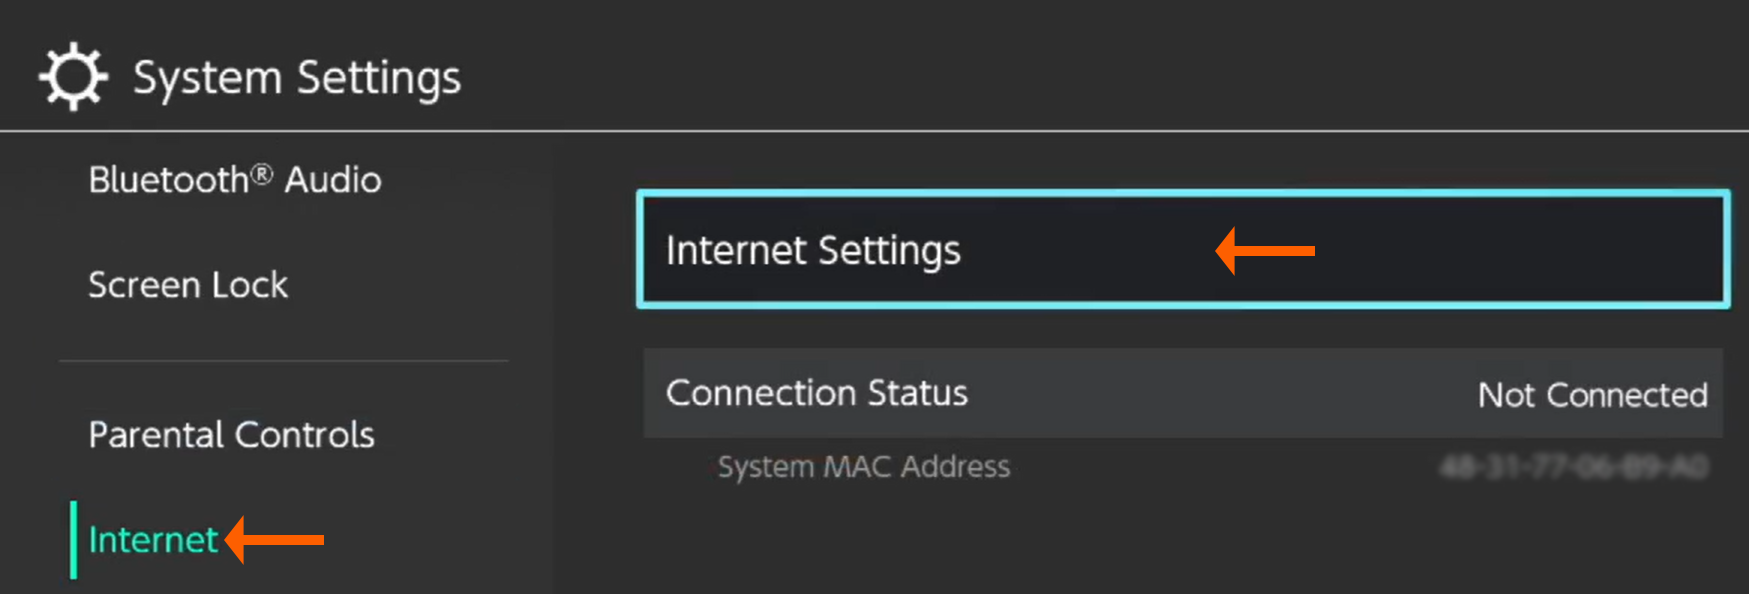
- In the System Settings options, select Internet.
- In Internet options, select Internet Settings.
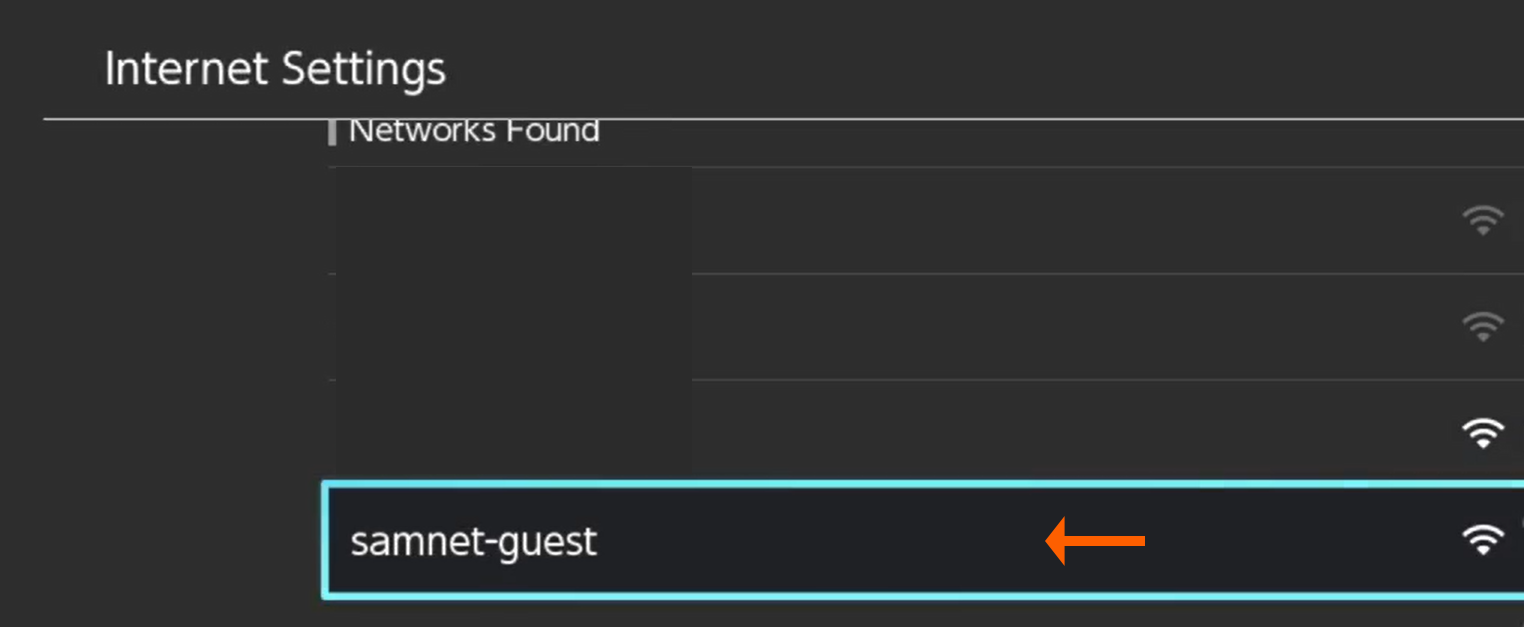
- On the list of connections, select samnet-guest.
Find the MAC Address
To get started, you will need the MAC address of the device.
- Navigate to System Settings.
- In the System Settings options, select Internet. The MAC address will be listed in Connection Status.
- Once you have the MAC address, register the device in MyDevices.
Register the Device
- As of August 15, 2024, if you are a residence hall resident, visit reshalldevices.shsu.edu. All others visit mydevices.shsu.edu.
- Sign in with your SHSU username and password if prompted.
- Scroll through the Acceptable Use policy and select I Agree.
- On the Residence Hall Devices or My Devices screen, select Add.
- On the Add Device screen, fill in the fields and select Submit.
- Your device is added to Residence Hall Devices or MyDevices.
- Connect an ethernet cable to the device to connect to the network.
Find the MAC Address
To get started, you will need the MAC address of the device.
- Navigate to Settings.

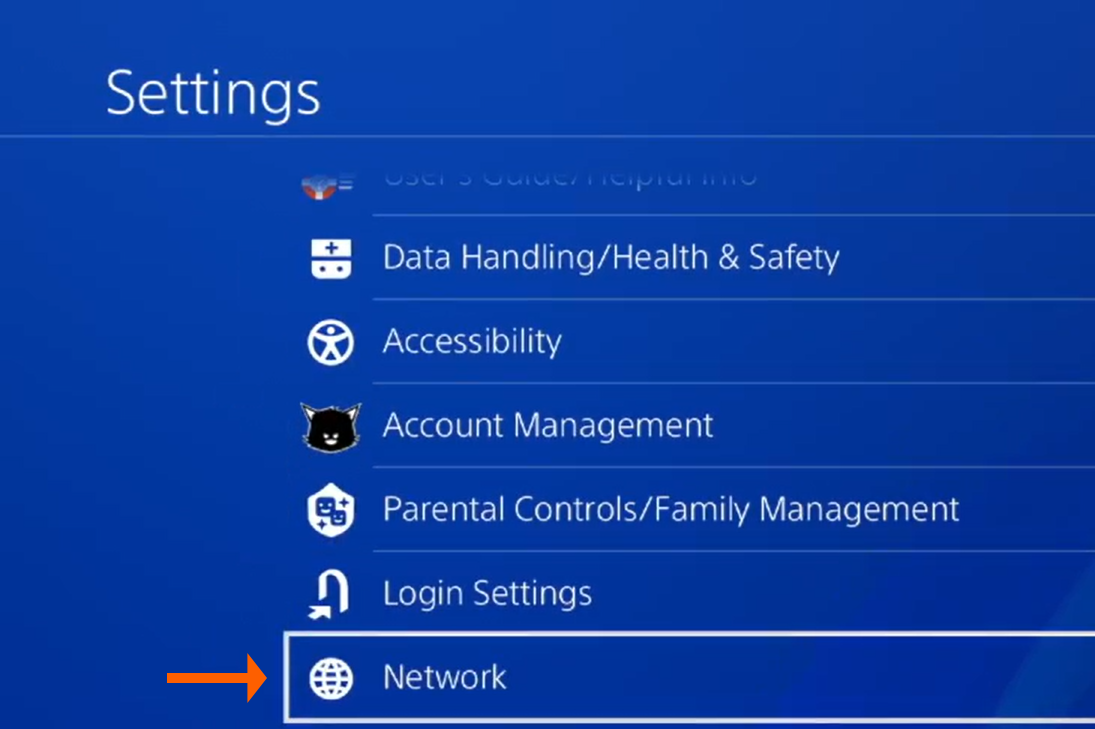
- In the Settings options, select Network.
- In Network options, select View Connection Status.
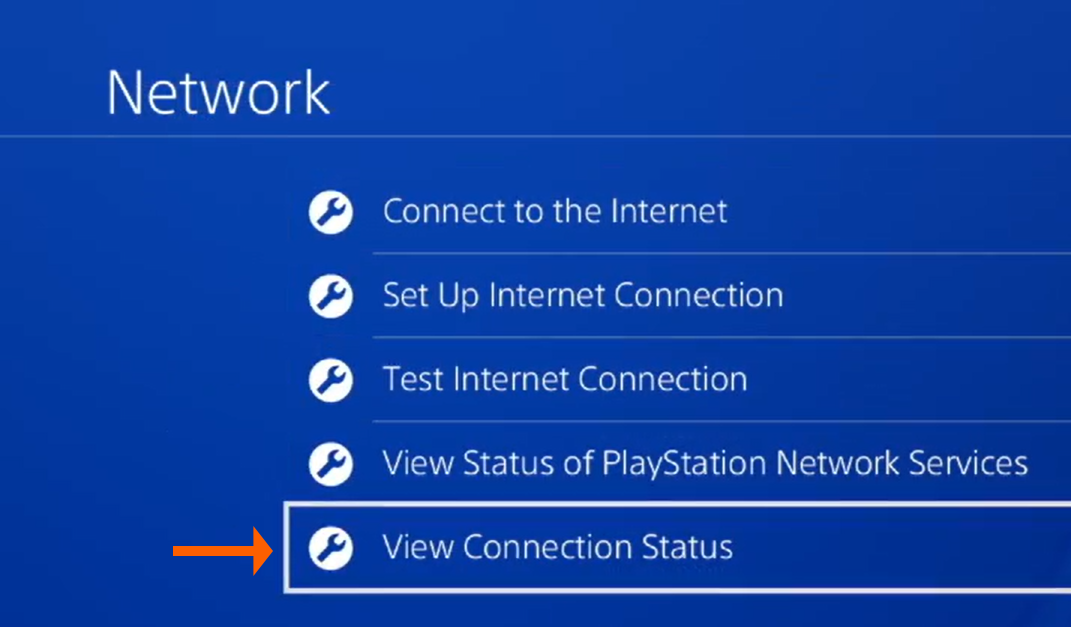
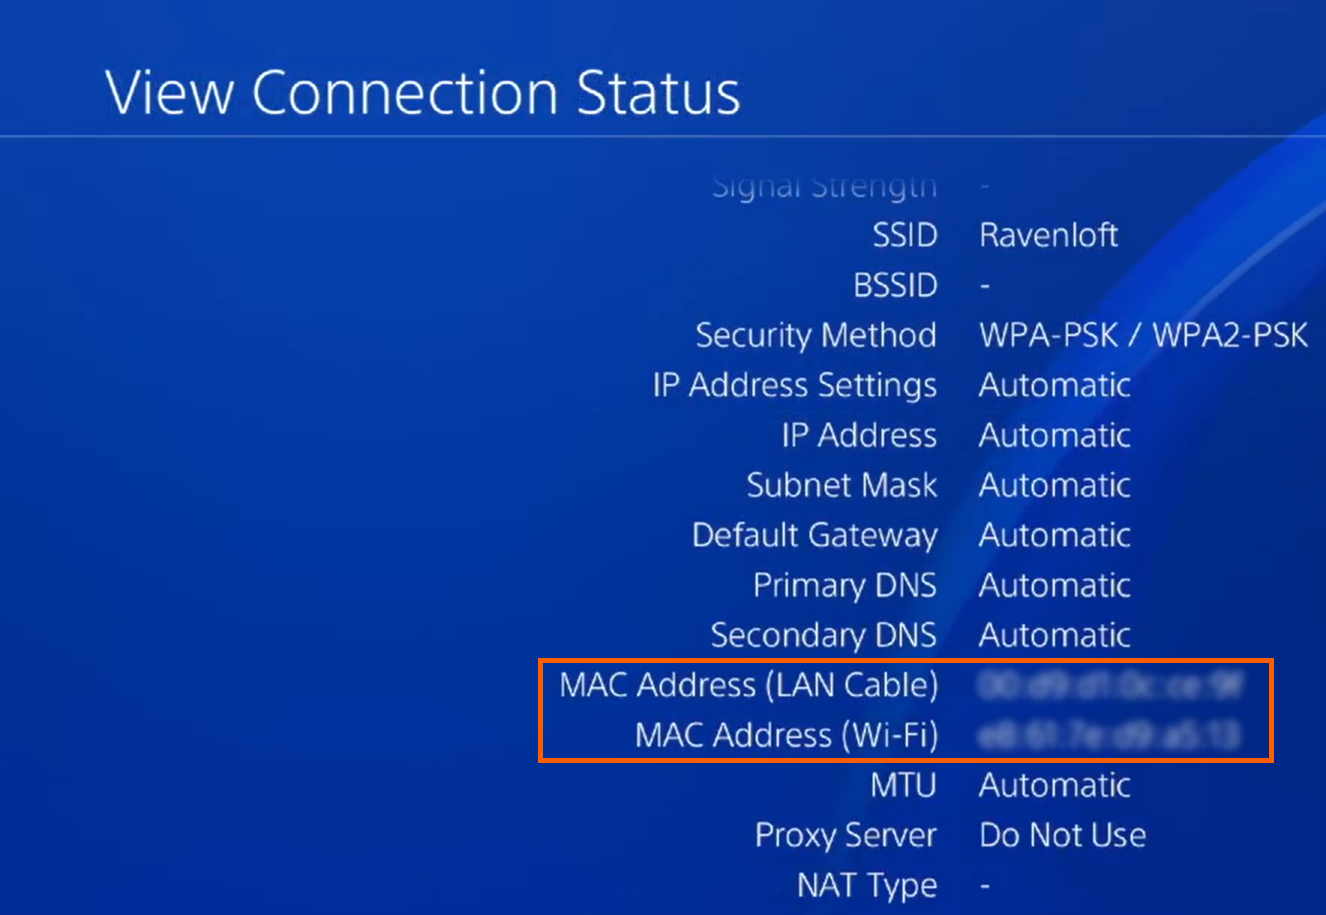
- The MAC address is listed in View Connection Status.
- Once you have the MAC address, register the device in MyDevices.
Register the Device
- As of August 15, 2024, if you are a residence hall resident, visit reshalldevices.shsu.edu. All others visit mydevices.shsu.edu.
- Sign in with your SHSU username and password if prompted.
- Scroll through the Acceptable Use policy and select I Agree.
- On the Residence Hall Devices or My Devices screen, select Add.
- On the Add Device screen, fill in the fields and select Submit.
- Your device is now added to Residence Hall Devices or MyDevices.
- Connect the device to the network.
Connect Device to the Network
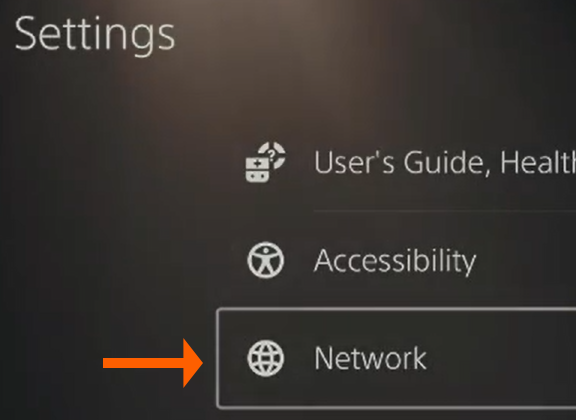
- Navigate to Settings.
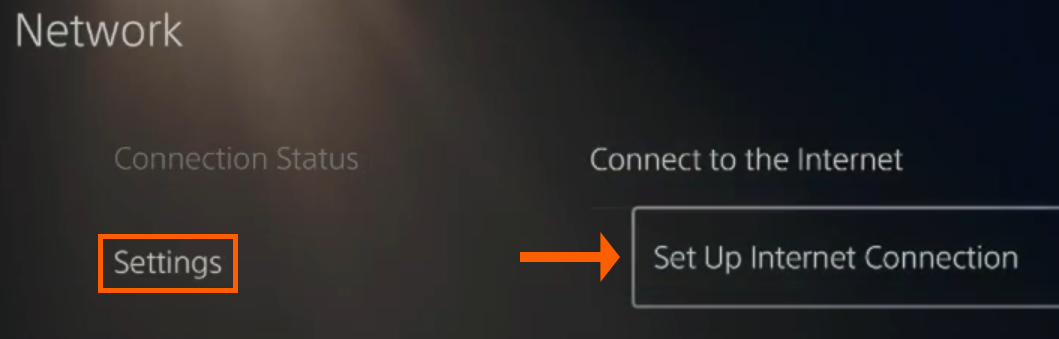
- In the Settings options, select Network.
- In Network Settings, select Set up Internet Connection.
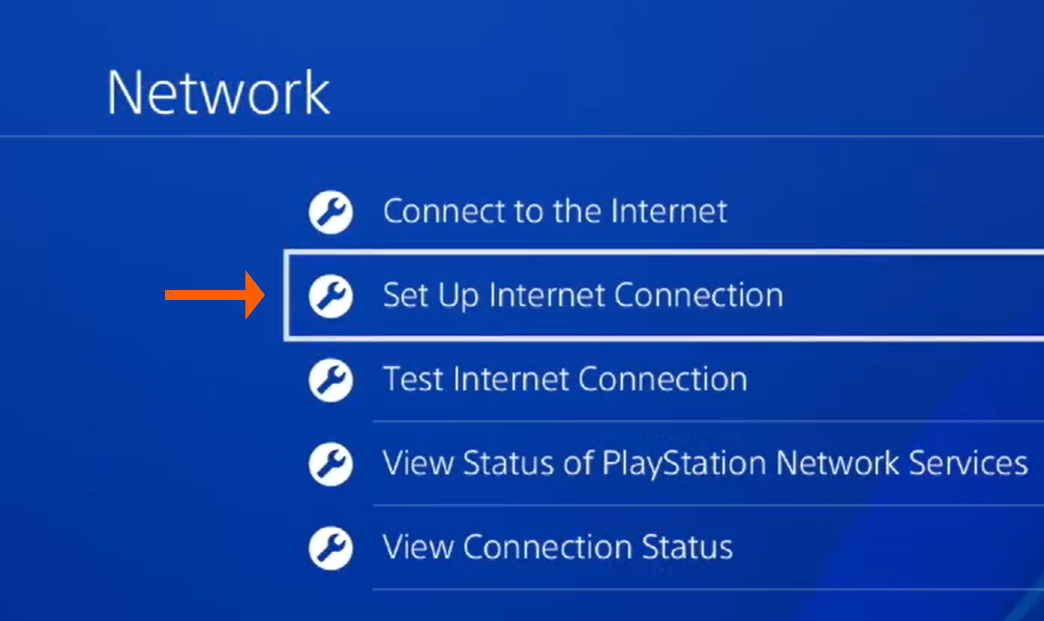
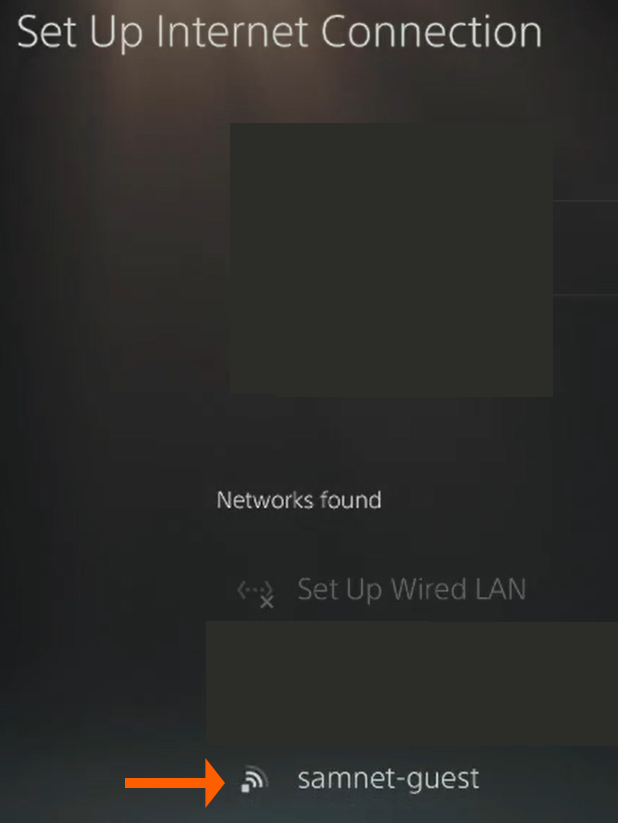
- Select Use Wi-Fi.
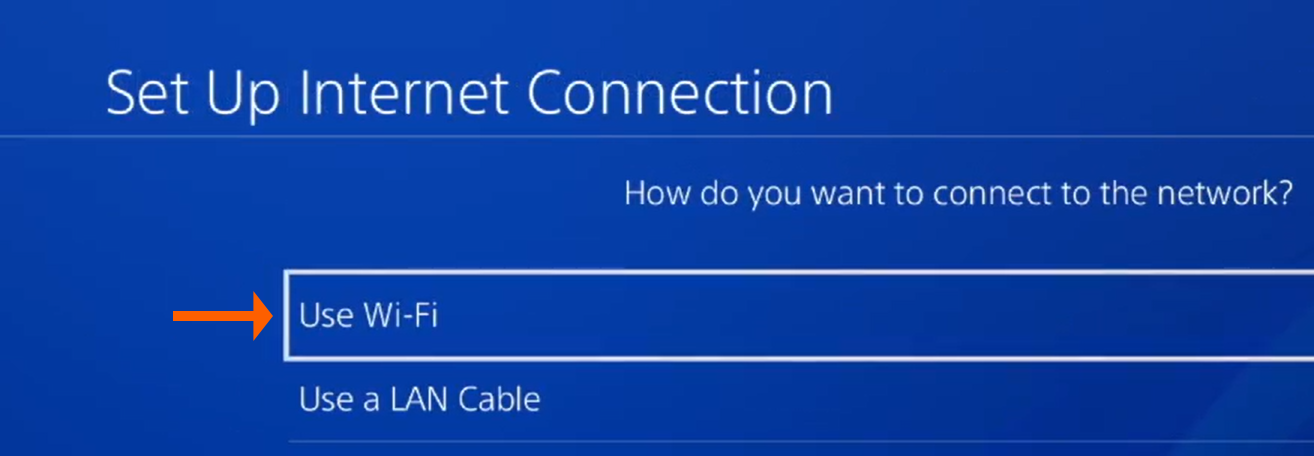
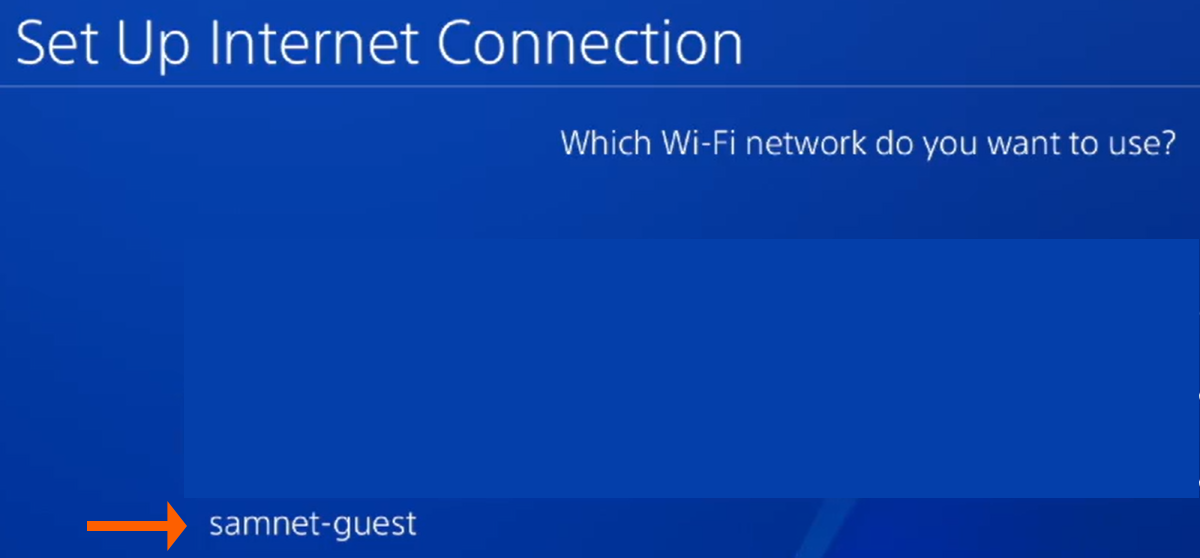
- Then select Easy.
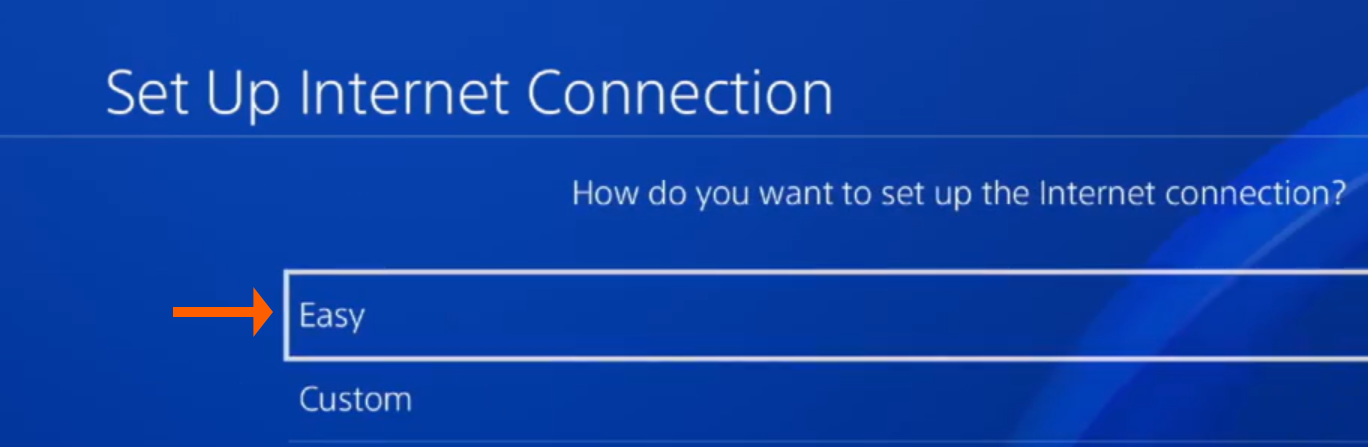
- On the list of connections, select samnet-guest.
Find the MAC Address
To get started, you will need the MAC address of the device.
- Navigate to Settings.
- In the Settings options, select Network.
- In Network options, select View Connection Status.
- The MAC address is listed in View Connection Status.
- Once you have the MAC address, register the device in MyDevices.
Register the Device
- As of August 15, 2024, if you are a residence hall resident, visit reshalldevices.shsu.edu. All others visit mydevices.shsu.edu.
- Sign in with your SHSU username and password if prompted.
- Scroll through the Acceptable Use policy and select I Agree.
- On the Residence Hall Devices or My Devices screen, select Add.
- On the Add Device screen, fill in the fields and select Submit.
- Your device is now added to Residence Hall Devices or MyDevices.
- Connect an ethernet cable to the device to connect to the network.
Find the MAC Address
To get started, you will need the MAC address of the device.
- Navigate to Settings.

- In the Settings options, select Network.
- In Network options, select View Connection Status. The MAC address will be listed in View Connection Status.

- Once you have the MAC address, register the device in MyDevices.
Register the Device
- As of August 15, 2024, if you are a residence hall resident, visit reshalldevices.shsu.edu. All others visit mydevices.shsu.edu.
- Sign in with your SHSU username and password if prompted.
- Scroll through the Acceptable Use policy and select I Agree.
- On the Residence Hall Devices or My Devices screen, select Add.
- On the Add Device screen, fill in the fields and select Submit.
- Your device is now added to Residence Hall Devices or MyDevices.
- Connect the device to the network.
Connect Device to the Network
- Navigate to Settings.
- In the Settings options, select Network.
- In Network settings, select Settings, then select Set up Internet Connection.
- On the list of connections, select samnet-guest.
Find the MAC Address
To get started, you will need the MAC address of the device.
- Navigate to Settings.
- In the Settings options, select Network.
- In Network options, select View Connection Status. The MAC address will be listed in View Connection Status.
- Once you have the MAC address, register the device in MyDevices.
Register the Device
- As of August 15, 2024, if you are a residence hall resident, visit reshalldevices.shsu.edu. All others visit mydevices.shsu.edu.
- Sign in with your SHSU username and password if prompted.
- Scroll through the Acceptable Use policy and select I Agree.
- On the Residence Hall Devices or My Devices screen, select Add.
- On the Add Device screen, fill in the fields and select Submit.
- Your device is now added to Residence Hall Devices or MyDevices.
- Connect an ethernet cable to the device to connect to the network.
Find the MAC Address
To use the Chromecast, you will need the MAC Address.
Locate the MAC address during Chromecast setup- From the Connect to Wi-Fi screen of the setup process, in the top right, tap More.
- Tap Show MAC Address.
- Register the device in MyDevices.
- Open the Google Home app.
- Touch and hold your device's tile.
- At the top right, tap Settings Device information.
- Under Technical information, check your MAC address.
- Register the device in MyDevices.
Register the Device
- As of August 15, 2024, if you are a residence hall resident, visit reshalldevices.shsu.edu. All others visit mydevices.shsu.edu.
- Sign in with your SHSU username and password if prompted.
- Scroll through the Acceptable Use policy and select I Agree.
- On the Residence Hall Devices or My Devices screen, select Add.
- On the Add Device screen, fill in the fields and select Submit.
- Your device is added to Residence Hall Devices or My Devices.
- Connect the device to the network.
Connect the Device to the Network
- Make sure your mobile device or tablet is linked to the same account as your Chromecast.
- Open the Google Home app.
- Touch and hold your device's tile.
- Tap Device information
- Tap Wi-Fi.
- Select samnet-guest.
The Chromecast can be used with an ethernet cable with the use of an adapter. SHSU does not provide the adapter.
Find the MAC Address
To use the Chromecast, you will need the MAC Address.
Locate the MAC address during Chromecast setup
- From the "Connect to Wi-Fi" screen of the setup process, in the top right, tap More.
- Tap Show MAC Address.
- Register the device in MyDevices.
Locate the MAC address after Chromecast setup
- Open the Google Home app.
- Touch and hold your device's tile.
- At the top right, tap Settings Device information.
- Under Technical information, check your MAC address.
- Register the device in MyDevices.
Register the Device
- As of August 15, 2024, if you are a residence hall resident, visit reshalldevices.shsu.edu. All others visit mydevices.shsu.edu.
- Sign in with your SHSU username and password if prompted.
- Scroll through the Acceptable Use policy and select I Agree.
- On the Residence Hall Devices or My Devices screen, select Add.
- On the Add Device screen, fill in the fields and select Submit.
- Your device is added to Residence Hall or My Devices.
Connect the Device to the Network
- Connect the Chromecast to a HDMI port on the TV.
- Plug the ethernet adapter to the micro-USB port on the Chromecast.
- Connect the ethernet cable to the ethernet adapter.
- Plug the ethernet cable into the ethernet port.
Find the MAC Address
To use the Roku, you will need the MAC address.
- Open the Roku app on your mobile device.
- Select Settings.
- Select About.
- MAC Address will be listed there.
- You can also find the MAC Address on the bottom or back of your Roku.
- Add the device in MyDevices.
Register the Device
- As of August 15, 2024, if you are a residence hall resident, visit reshalldevices.shsu.edu. All others visit mydevices.shsu.edu.
- Sign in with your SHSU username and password if prompted.
- Scroll through the Acceptable Use policy and select I Agree.
- On the Residence Hall Devices or My Devices screen, select Add.
- On the Add Device screen, fill in the fields and select Submit.
- Your device is added to Residence Hall Devices or My Devices.
- Connect the device to the network.
Connect the Device to the Network
- Using your Roku remote, select Settings.
- Select Network.
- Select Wireless (Wi-Fi).
- Select Set up new Wi-Fi connection.
- Select samnet-guest.
Find the MAC Address
To use the Roku, you will need the MAC address.
- Open the Roku app on your mobile device.
- Select Settings.
- Select About.
- MAC Address will be listed there.
- You can also find the MAC Address on the bottom or back of your Roku.
- Add the device in MyDevices.
Register the Device
- As of August 15, 2024, if you are a residence hall resident, visit reshalldevices.shsu.edu. All others visit mydevices.shsu.edu.
- Sign in with your SHSU username and password if prompted.
- Scroll through the Acceptable Use policy and select I Agree.
- On the Residence Hall Devices or My Devices screen, select Add.
- On the Add Device screen, fill in the fields and select Submit.
- Your device is added to Residence Hall Devices or My Devices.
Connect the Device to the Network
- Connect an Ethernet adapter to the Roku then connect the network cable to the Ethernet port of the compatible adapter.
- Select Home on the remote.
- Scroll and select Settings.
- Select Network.
- Select Set up connection.
- Choose Wired.
- When selecting Wired, the device will automatically connect to the network and the internet.
Find the MAC Address
To use the Smart TVs, you will need the MAC address.
On Apple TV
- Open the menu options and go to Settings.
- Click on General, then click on About.
- MAC address is displayed as Wi-Fi Address or Wireless ID.
On Samsung Smart TV
- Open the Settings menu.
- Select Support.
- Select About this TV or Contact Samsung.
- Scroll down to where the MAC address is displayed.
On Sharp Smart TV
- Open the TV's menu, select Initial Setup, and press Enter on the remote.
- Select Internet Setup, then select Network Setup.
- Select Connection Type, then highlight WIRED and press Enter.
- Select IP Setup and the MAC Address should be displayed at the bottom of the page.
On Sony Smart TV
- Press the Home button on the remote.
- Scroll to Settings and press Enter, then select Preferences.
- Select Setup, press Enter, and then scroll to and select Network Setup.
- Select Network Setup ‐ Status and your MAC Address should be displayed on screen - be sure it specifies Wired and not Wireless.
On Vizio Smart TV
- Press Menu on the remote, then scroll to Network and press OK.
- Select Network Connection, then scroll to and select Manual Setup to reach the IP Settings menu.
- The bottom of the menu should display the RJ45 MAC Address ‐ Do not register the wireless MAC Address.
Register the Device
- As of August 15, 2024, if you are a residence hall resident, visit reshalldevices.shsu.edu. All others visit mydevices.shsu.edu.
- Sign in with your SHSU username and password if prompted.
- Scroll through the Acceptable Use policy and select I Agree.
- On the Residence Hall Devices or My Devices screen, select Add.
- On the Add Device screen, fill in the fields and select Submit.
- Your device is added to Residence Hall Devices or My Devices.
- Connect the device to the network.
Connect the Device to the Network
- Open Settings.
- Navigate to Wi-Fi.
- Select samnet-guest.
While most smart TVs have an ethernet port, we suggest locating it before proceeding.
Find the MAC Address
To use the Smart TVs, you will need the MAC address.
On Apple TV
- Open the menu options and go to Settings.
- Click on General, then click on About.
- MAC address is displayed as Wi-Fi Address or Wireless ID.
On Samsung Smart TV
- Open the Settings menu.
- Select Support.
- Select About this TV or Contact Samsung.
- Scroll down to where the MAC address is displayed.
On Sharp Smart TV
- Open the TV's menu, select Initial Setup, and press Enter on the remote.
- Select Internet Setup, then select Network Setup.
- Select Connection Type, then highlight WIRED and press Enter.
- Select IP Setup and the MAC Address should be displayed at the bottom of the page.
On Sony Smart TV
- Press the Home button on the remote.
- Scroll to Settings and press Enter, then select Preferences.
- Select Setup, press Enter, and then scroll to and select Network Setup.
- Select Network Setup ‐ Status and your MAC Address should be displayed on screen - be sure it specifies Wired and not Wireless.
On Vizio Smart TV
- Press Menu on the remote, then scroll to Network and press OK.
- Select Network Connection, then scroll to and select Manual Setup to reach the IP Settings menu.
- The bottom of the menu should display the RJ45 MAC Address ‐ Do not register the wireless MAC Address.
Register the Device
- As of August 15, 2024, if you are a residence hall resident, visit reshalldevices.shsu.edu. All others visit mydevices.shsu.edu.
- Sign in with your SHSU username and password if prompted.
- Scroll through the Acceptable Use policy and select I Agree.
- On the Residence Hall Devices or My Devices screen, select Add.
- On the Add Device screen, fill in the fields and select Submit.
- Your device is added to Residence Hall Devices or My Devices.
Connect the Device to the Network
- Find the Ethernet port on the back of the TV.
- Connect an Ethernet cable from the Ethernet wall port to the port on the TV.
- If the TV does not automatically connect, select Menu on the TV’s remote and then go to Network Settings.
- Select the option to enable wired internet.
Find the MAC Address
To use the Firestick, you will need the MAC address.
- From the Home screen, press Menu.
- Select Settings. You should see the Wi-Fi MAC Address located in the Device Info section.
- Register the device in MyDevices.
Register the Device
- As of August 15, 2024, if you are a residence hall resident, visit reshalldevices.shsu.edu. All others visit mydevices.shsu.edu.
- Sign in with your SHSU username and password if prompted.
- Scroll through the Acceptable Use policy and select I Agree.
- On the Residence Hall Devices or My Devices screen, select Add.
- On the Add Device screen, fill in the fields and select Submit.
- Your device is added to Residence Hall Devices or My Devices.
- Connect the device to the network.
Connect the Device to the Network
- From the Home screen, use your Fire TV remote to select Settings.
- Select Network. Your device will automatically detect nearby networks.
- Select samnet-guest.
The Firestick can be used with an ethernet cable with the use of an adapter. SHSU does not provide the adapter.
Find the MAC Address
To use the Firestick, you will need the MAC address.
- From the Home screen, press Menu.
- Select Settings. You should see the Wi-Fi MAC Address located in the Device Info section.
- Register the device in MyDevices.
Register the Device
- As of August 15, 2024, if you are a residence hall resident, visit reshalldevices.shsu.edu. All others visit mydevices.shsu.edu.
- Sign in with your SHSU username and password if prompted.
- Scroll through the Acceptable Use policy and select I Agree.
- On the Residence Hall Devices or My Devices screen, select Add.
- On the Add Device screen, fill in the fields and select Submit.
- Your device is added to Residence Hall Devices or My Devices.
Connect the Device to the Network
- Connect the Firestick to a HDMI port on the TV.
- Plug the ethernet adapter to the micro-USB port on the Firestick.
- Connect the ethernet cable to the ethernet adapter.
- Plug the ethernet cable into the ethernet port.
How to Sponsor a Guest
A guest is someone visiting the university with an invitation from a faculty member or staff. Faculty and staff may sponsor a guest for up to 14 days and faculty and staff are responsible to all guest internet activity.
- Go to the website sponsor.shsu.edu.
- Sign in with your SHSU username and password if prompted.
- Scroll through the Acceptable Use policy and select I Agree.
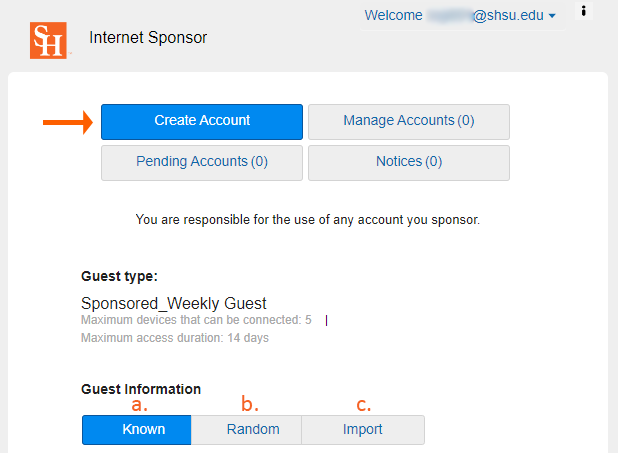
- Ensure Create Account is selected and select the type of guest.
- Known: You know the First and Last Name and email address of the guest.
- Random: Unavailable to users.
- Import: You can upload a .CSV file that includes First Name, Last Name, Email address and Reason for visit (template download provided in portal).
- Fill out the Guest Information.
- In the Access Information section, you can leave at the default of 5 days or update the duration or time frame the guest will need access.
- Select Create.
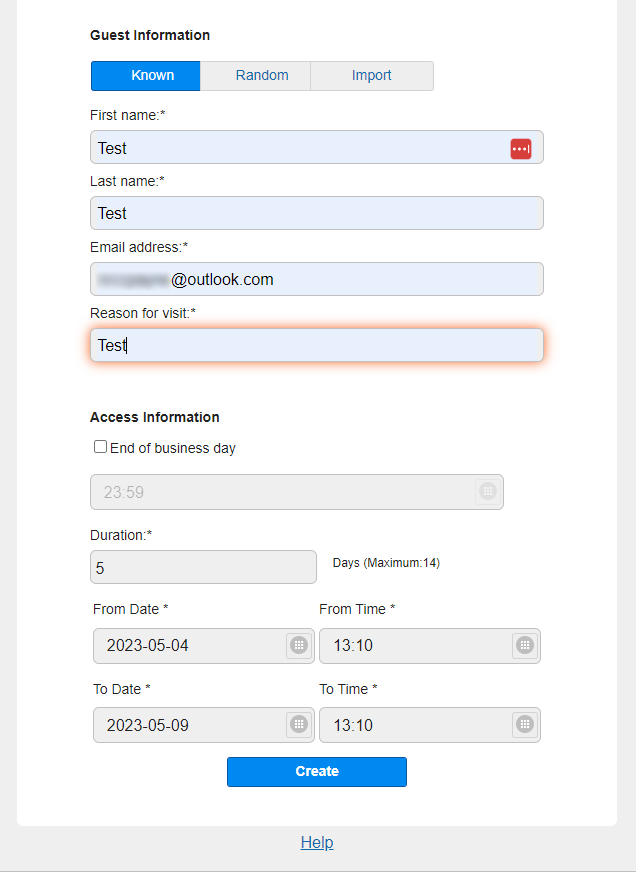
- A confirmation will display with the guest information.
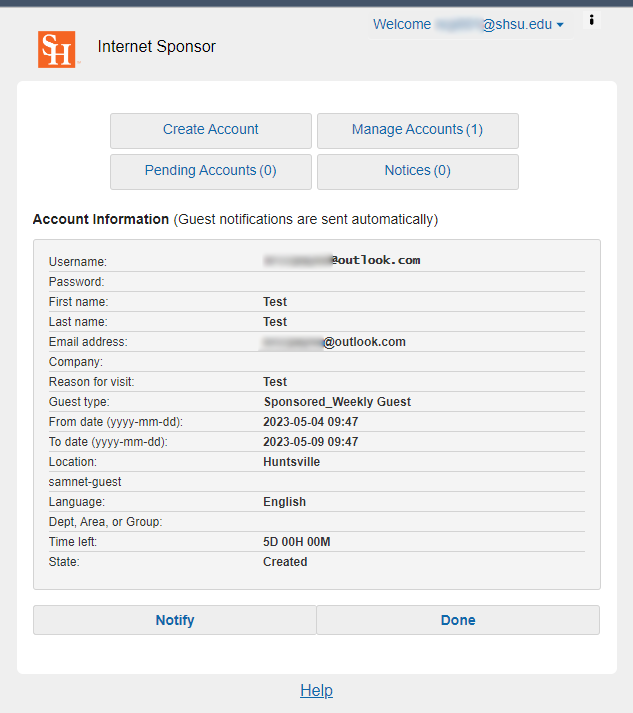
- Guests receive an email with the username and password to use to login to the samnet-guest wireless network.